
Mastering Light in Photography: A Photography Guide
- George Tatakis
- May 16, 2024
- 11 min read
Updated: Mar 2, 2025
Understanding how light works is probably number one on the list of understanding photography. Light is all you can use to create a photograph. That is the reason we call it photography. The work comes from the Greek words "Φως / Phos" which stands for light and "Γραφή / Graphē" which is the verb to write. Essentially, photography is writing with light. No matter how strong your subject is, if not lit correctly, the scene cannot suggest a photograph.

The Importance of Light in Photography
A Dense Summary
Light is crucial in photography, as it shapes shadows, highlights, and contrast in photographs, adding depth and atmosphere. To master light, experiment with different lighting directions—side lighting creates dramatic shadows, while backlighting produces a soft, ethereal glow. Adjusting exposure settings on your camera helps control the amount of light for well-lit images.
Practical tips for using light effectively include using reflectors to fill in shadows and diffusers to soften harsh light. Adapt your lighting techniques based on the environment—whether outdoors or indoors—to achieve the desired mood in your photos. By understanding and manipulating light, you can enhance the quality and impact of your photographs, creating visually compelling images.
This approach to understanding light in photography provides actionable insights for photographers, allowing them to leverage light creatively and effectively. By experimenting with different lighting techniques and adapting to various environments, photographers can elevate their skills and produce captivating images.
Understanding How Light Works. A Guide to Great Photography.
When making an image, we always need to consider our light source or sources, as well as their characteristics and qualities. We do that by evaluating the result of the light sources on our subjects. However, we need to understand beforehand how the specific aspects of each light source affect these results, to be able to control it.
The good news is that there are only three aspects that you need to consider for each light source. By deeply understanding these three aspects of light you will be able to light the most complex scenes you can imagine. That is true for both available/natural light and studio lights.
Get your copy of the book by George Tatakis, "Throw away your camera & become a photographer"
⭐⭐⭐⭐⭐ 5-star review from Readers' Favorite
Types of light sources and light hierarchy.
Let's briefly discuss what a light source might be. A light source might be anything that directly or indirectly produces light that lights up your subjects in your frame. The source can be either natural or artificial. By natural light we generally mean the sun, although we can also mean the moon, this is usually not enough to light up a scene photographically. So by direct natural light, we mean the sun, but we also include any source that is our main light source that comes from the sun. These are the clouds, a window, a doorway and so on. By indirect light, we mean the light that lights up the subject through reflection and can be either natural or artificial. A few examples of indirect light are the light coming from reflectors, walls, mirrors and so on. By artificial light, we mean sources that are man-made. These can be studio lights, light bulbs, neon signs, candles and so on. Artificial light can also be direct or indirect as explained above.
You also need to understand the light source hierarchy in your scene, when you have more than one light source available (direct or indirect). This hierarchy is dictated by the amount of luminosity that each light source provides to your subject. The light that provides the most, is the primary light, the next one is the secondary and so on. You need to place your subject in a way that is mostly complemented and defined by your primary light source and then use the rest of them as auxiliary sources. A way to do this more easily, especially when using studio lighting, is to eliminate all light sources but one each time, to decide on its exact location.
The mechanics of light. The inverse square law.
Don't worry, I am not going to get into the mathematics of light. For anyone interested, you can google that and find out more. I will try to explain the practical implications of this law instead, and how it applies to photography. This law gives the solution to two of three aspects of light as discussed above.
So these two aspects are (a) the size and (b) the distance of the light source in comparison to your subject in your frame. In each photograph you make, you must be well aware of the number of light sources, natural or artificial, direct or indirect. For each of these sources, you need to be well aware of their distance from your subject and their size.
Each of these two aspects plays a primary role in the contrast of your subject's shadows and in how far in your scene this light reaches. This latter effect is what we call the light falloff.
Falloff or attenuation
So more formally, the light falloff is the decline in illumination with distance. This is also called attenuation, but we mostly use the term falloff in photography.
If you think about it, this notion can be considered common sense. If you are reading a book and you light up the room with a candle, it will be much easier to read the book if the candle is by your shoulder than if the candle is on a table five metres away from you.
In fact, according to the mathematical law, when you double the distance of the source, you get 1/4 of the illumination and so on (remember, the squared part?)
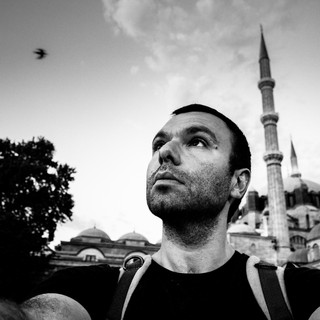
The application of falloff in photography and the takeaway point here is that if the light source is very far away from your scene, then most of the scene will be lit evenly. A light source that is far away for example is the sun. The surface of the Earth, where your scene will be taking place, is very far from the sun, thus each point in your scene can be considered to be equally far from the sun. Therefore it will receive the same illumination. See the image below.


Let's also discuss how the light source size affects the falloff. This is the same aspect as the distance, but we just use it to understand the inverse square law application in photography. This is because we are referring to the size of the source in comparison with your subject in question. Not the absolute source size per se.
Going back to the example of the candle, consider now the size of the candle's flame. The closer the candle is to your book, the larger the flame is, in comparison with it.
So we treat the larger light source as a source being nearer and a smaller source being further away. Thus, the larger the light source, the larger the falloff.
Consider the same scene above at night, lit by an artificial softbox, placed near the subject at the rightmost end of the frame. This time the subjects near the light source receive more illumination than the rest of the subjects.


Contrast and examples of scene light sources.
The distance, therefore the size as well, of the light source, also plays a significant role in the contrast and intensity of the subject's shadows.
You can easily think of it like this: The greater the falloff, the less contrast and intensity in the shadows. Or, the closer and/or larger the source compared to your subject, the less contrast and intensity in the shadows.
Let's think of actual applications. When we have a clear sky and our scene is lit by the sun we notice how dense the shadows are with great contrast. That is not true when we have an overcast day. That is because the light source in this case is the clouds. So we now have a huge light source, much nearer to the subjects. Shadows are eliminated, and the image is much flatter. This is usually considered to be more flattering for portraits. Thus, you see in studios that photographers commonly use softboxes or umbrellas in front of the light bulbs. These light-shaping tools make the source larger, therefore reducing the contrast of the result. Similarly, you may see photographers that use on-camera flash to turn the flash towards a wall or the ceiling. What this does is that it makes the wall and the ceiling the light source. So it's a large source that will provide less contrast to your subject.
Flash diffusers (caps that attach to the flashlight) or turning the flash towards the sky, are two silly things that people who don't understand light mechanics do. In the first case, you have more or less the same light size, therefore there is no difference. In the second case, you try to reflect a flashlight from the sky which is science fiction. The scene in this case is lit just by the side of the flashlight, therefore you have even more contrast, plus you drain the battery since you need much more power to achieve the same result. See? if you just think about the inverse square law, you can solve any light situation!


The third aspect of light. Angle.
The final aspect we need to be aware of for each of your light sources, especially the main source, is the angle of the light regarding your subjects.
A different angle of light source provides a different stylistic approach. Different angles make for more flat, or dramatic images. That is because when light hits different planes of your subjects, it sculpts the resulting form differently. Do not forget, that light is the only means that creates a photographic image inside the sensor of the film of your camera.
Since we live in a three-dimensional world, we have to consider the horizontal angle of the light source, as well as the vertical one. If you think that your scene is inside an imaginary spherical bubble, the light source can be at any point on that bubble and hit the subject from a different angle.

So the horizontal angle would be when we move the light source along the equatorial lines of this bubble, whereas the vertical angle would be when we move the source along the meridian lines of the bubble.
We can easily think of the difference between the two to be that the horizontal angle is a "drama dial", in the sense that it controls how dramatic the result looks, whereas the vertical angle is a dial to control in a way how "natural" the subject looks.
Horizontal angle
The image below shows how this dial works for the horizontal angle, from 0 to 90 degrees, with 0 degrees signifying the light is behind the photographer, and 90 degrees when the light is at the side of the subject.

So when the light source is behind the photographer, thus 0 degrees, your subject will look flatter and less dramatic. Whereas when the light source hits your subject at its side, thus 90 degrees, your subject does not look flat anymore and is much more dramatic. See the examples below. There is no bad or good way of doing that, it all depends on the result you want to achieve. At times, although a flat image looks less dramatic, it might be more flattering to a portrait.


Backlight
The horizontal angle could also be above 90 degrees, up to 180. That is considered a backlight. This light is used to create a more atmospheric look, including silhouettes. Regarding the angle, you can either have silhouettes or subjects partially lit.
You can also use a backlight as a secondary light source, in the case of also using a fill-in flashlight to light up your main subject sitting against the backlight, or even to create a rim light at the sides of your subject to separate it from the background.

Vertical angle
The vertical angle of the light source in a way dictates how natural the image looks. Again, there is no right or wrong here, it all comes down to the result you want to achieve. This fact has to do with the fact that we are more used to seeing the world with natural light during the day, therefore our brain receives as more "natural" the light that hits a subject at a vertical angle of maybe between 30-50 degrees. All other degrees give a kind of unnatural, uneasy look. The light that comes from the top, creates shadows in the eyes and nose, whereas the light coming from the bottom creates shadows above the eyebrows etc. Do you know how people put a flashlight at their chin pointing upwards to scare other people? That's the effect.

Optimizing Golden Hour Photography
The golden hour, often hailed as the magic hour in photography, encapsulates the last hour before sunset and the initial hour after sunrise. This time frame is revered by photographers for its warm, soft light, which is ideal for capturing stunning images. Unlike direct sunlight during other parts of the day, the golden hour's angled rays create a soft, flattering glow, enhancing skin tones and minimizing harsh shadows.
Harnessing the power of the golden hour involves understanding its unique characteristics. The light during this period is directional, casting longer shadows and allowing for creative lighting effects such as silhouettes and sunbursts. Additionally, the warm color temperature of the golden hour imbues photographs with a palette of yellows, oranges, and reds, evoking feelings of happiness and warmth.
To excel during the golden hour, preparation is key. Plan your shoot by scouting locations and visualizing compositions in advance. Use specialized apps to track sunset times and the sun's position for optimal timing. During the shoot, take advantage of the rapidly changing light by capturing multiple frames to ensure you seize every captivating moment.
In post-processing, leverage tools like HDR blending and white balance adjustments to refine your golden hour photographs. By understanding and embracing the nuances of the golden hour, photographers can elevate their craft, capturing the enchanting beauty of this fleeting period.

Conclusion
If the mechanics of light are understood, your photography will be significantly improved. By deeply understanding this guide, you will be able to solve any lighting situation, either with natural or artificial/studio light.
To sum up, you now need to be able to understand how many light sources are lighting up your scene, either directly or indirectly and understand which light or lights are the primary ones in your scene.
Then you need to understand all three aspects of each light source, namely the distance from your subject, their size and the angle at which they hit the subject.
I know it is a lot to take in in one sitting, but start practising and keep coming back to this text to better understand some of its parts. A good exercise is to put an egg on a tabletop. Use a desk lamp as your light source and experiment with all the different options. I promise everything will make more sense after that.
Till next time,
Love xx
Get your copy of the book by George Tatakis, "Throw away your camera & become a photographer"
⭐⭐⭐⭐⭐ 5-star review from Readers' Favorite


Comments