
Photography Composition 101, part 2
- George Tatakis
- May 21, 2024
- 13 min read
Updated: Apr 17, 2025
This is photography composition continued. If you want to see part 1, read it here.
Or watch my full 3-HOUR film here:
Table of Contents
Let's go on with Photography Composition 2:
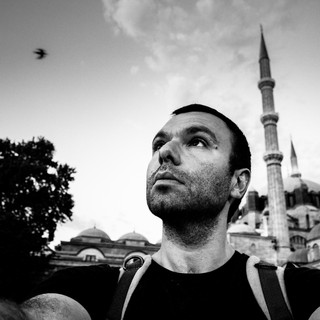
The Dutch angle (actually Deutsch angle)
The name Dutch angle came from a mispronunciation of the word Deutsch, so it has to do with Germany, not The Netherlands. It came from German filmography and nowadays is also called the German angle.
The Dutch angle is simply when we tilt the camera on its axis, to create a tilted horizon line. It has the impression of a tilted head. This is very useful when you want to create a sense of uneasiness and make your image look unsteady and unusual. It can also be seen in many noir films where these kinds of emotions are the goal.

Get your copy of the book by George Tatakis, “Throw away your camera & become a photographer” on Amazon

⭐⭐⭐⭐⭐ 5-star review from Readers' Favorite
Chiaroscuro in photography
Chiaroscuro is a technique mostly used in painting, but it can also be used in photography. It is mainly the play between light and shadow, where the contrast is usually exaggerated and bright parts look very bright whereas dark parts look almost black. It comes from the Latin words Clarus (clear, bright) and Obscurus (dark, obscure). The Italian term Chiaroscuro is now commonly used and comes from the respective Italian words Chiaro and Oscuro.
In photography, you can achieve this by using a single sidelight source that illuminates your subject and leaves the rest of the image dark. You can then exaggerate the effect even further by increasing the contrast in your post-processing. Chiaroscuro can create stronger dynamics within your photograph.

Off-centre
Placing your subject off-centre in the frame might help you give more emphasis to its surroundings while at the same time paying attention to it, being in the foreground. It is a technique I do not commonly use but have done so on a few occasions. It sometimes might help with the dynamics of your image, depending of course on the rest of the composition.

Circles
Circles are another very basic shape, embedded in our brains. They are also a dynamic element, signifying an endless loop. It also helps to guide your eyes to the subject that lies within its boundaries. Look for circles around you and use them as either compositional elements/objects or as frames to place your subjects inside.

Use of on-camera flash
Using an on-camera flash can help in many ways with your composition. The flash will instantly create a surreal effect, as this is an unnatural light for any scene. We are not used to seeing scenes in real life illuminated by a flashlight. Furthermore, when used as fill light, it can help illuminate a backlit subject that would otherwise look like a silhouette in your photograph. Finally, the on-camera flash can help separate your foreground subject from its background, creating thus a contrasty figure-to-ground ratio.

Imperfections
Many photographers strive to get spotless exposure. No motion blur, no lens blur, ultra-sharp, no grain, you name it. In fact, throughout the history of photography, we have had many paradigms of iconic images that have been imperfect. Imperfections can sometimes add interest to your image rather than spoil it. So stop worrying about having a spotless photo, but rather focus on your composition and subject. Imperfections sometimes can even make it look better!

Shadows
Often, shadows may create an extra subject inside your frame. They can be especially useful when they are placed so that they contrast with the background around them. Similar to any other subject then, you can treat it as such. You can work well with shadows in a lighting configuration that provides more contrast, which will help cast dark and sharp shadows. This can be for example outdoors in full sun. Generally, the light source that creates the most contrast would be a small, bright source, that is far away from the subject lit. The sun is a huge source, but since it is millions of miles away, we consider it a small ultra-bright light source. (More about how light works in this article)

Textures
Textures are to be considered at all times in your photography. Interesting textures make up for more interesting photos. Different textures refract and deflect light in multiple ways, thus giving variation across the frame. Use surfaces covered in tiles, wallpaper, wood, weathered, plaster, and more in your composition. Also, pay attention to the textures of the objects that take part in the frame as subjects. You can add several items with interesting textures, such as fruits, flowers, items, tables, chairs, or anything that its textures add to its form. The clothes of your main subject, if that is a person, play of course a very significant role as well.

Leading lines
Leading lines are a helpful tool to guide the viewer's eyes through the image towards a specific subject or direction. Look for physical lines around you and place both the subject and yourself in a way that the lines lead to the subject. Apart from physical lines, you can use suggested lines, such as the direction of a look, or objects' orbits.

Rectangles
Another basic shape that our brain enjoys seeing is the rectangle. Rectangles are used mostly as frames within a frame, but you also can use them as compositional elements by themselves. Rectangles may give you a sense of security, as well as confinement. Furthermore, when you use many of them in one composition, like the one below, you can create a sense of pattern, which might make your composition even more interesting.

Repeating forms
One of my favourites. One can't have enough of a good thing. Repeating forms in an image can add to the surrealism of the photo by a lot. They can be from simple forms like circles or rectangles to more complicated ones like the ones found in the image below. I always try to find scenes where there are too many of something, being flowers, fruits, boxes, newspapers, whatever, as I have found it to be a good start for a background most of the time.

Centred eye
That is a technique used since the Renaissance. When shooting a portrait, you can place the dominant eye exactly along the central axis of your frame. What this does is that it makes the eyes of the portrait look at you, the viewer, no matter the angle from which you are viewing the image. By dominant eye, we mean either the eye that has more light or the eye that is closer to the viewer. As an extra tip here, if you place the secondary eye along the central line instead, you might manage to make the portrait seem as if it's turning its head towards you.

Vectors
Vectors in your composition (arrows), can show the direction of motion, or direct the viewer's eye across the image, similar to the leading lines. Vectors however can point in a direction away from the subject, so they are not necessarily used to direct our eyes towards the subject. They can, as in the example below, signify a continuation in the story, or create mystery as to what is hidden in the direction they are pointing. As you can see below, not only the road is used as a vector, but also the direction in which the leader is looking and the formation of the three men.

Low angle
Shooting from a low angle gives a 'Superman' effect when photographing people. This is because as discussed before in perspective, when you shoot from a low angle, you also take the horizon line lower. Therefore objects look larger on their upper part and smaller on the lower, taking the shape of an inverse triangle. This is because the angular lines need to travel downwards to meet their vanishing points along the lowered horizon line. This happens with any object, not just people. However, when used with people, it gives them an authoritative posture and helps create a more 'epic' look for them.

Pockets of light
By pockets of light, we refer to the situations where some rays of light hit our scene, only providing some parts of it with light. This creates a very dramatic look when properly used. To create pockets of light when working with natural light such as a window, you need to find creative ways to block part of it, to leave a very small room for the light to pass through. Try to leave just a small hole, or, if there are opaque curtains available, close them and just leave a narrow strip of light to enter. You then need to block any other light coming into this room to avoid reflections from the surrounding surfaces. For those who work with artificial studio lights, light pockets can be achieved by using honeycomb grids and/or snoots.

Interesting background
Background to me is as important as the subject as it should be for yourself as well. Every part of a photograph is equally important, and the background is one of the elements of the composition. When there are people inside our frame, the viewer tends to be drawn by them. However, you should always consider how important the background is to the storyline of your photograph and make a judgment based on that, on how much weight you want to give to it.

Motion
Motion can be portrayed in different ways in photography. Most people think of motion blur as a way to portray motion in a photograph. There are other ways to do it. Frozen motion can also suggest the dynamic of movement. When your subject looks as if it follows a certain trajectory, the mind of the viewer wants to see this action completed so it fantasizes about it. Another way to consider is to use multiple people looking in different directions thus creating a virtual trajectory of sights.

Negative space
By negative space, we mean simply unoccupied space within the frame. Nothing is happening within this space. We call it negative in the sense that this space is not utilized by the composition. However, negative space in a photograph can be a very interesting compositional element. Try to block large portions of an image with negative space. Treat this space as an object, so use other guidelines to place it in your image. There are even examples in photography where most of the end image is negative space.

Reflections and mirrors
Mirrors and reflections create mystery in your composition. It is a personal favourite compositional element. Whenever I see a mirror around the scene I immediately start thinking of how to use it in my composition. Mirrors create a sense of mystery in a photograph and can be used in many creative ways. A small tip for when you use a mirror with a portrait looking at you. After placing the mirror as precisely as you can, take your position and compose your picture. Ask then your model to look into your lens through the mirror, instead of trying to find them yourself by changing your position.

Mirror effect
A more advanced and interesting variation related to mirrors is when you create a composition that gives the feel of a mirror, with different things happening on each side. You can do this by spotting a reference frame, such as a door or a window, and placing similar objects on each side. You can end up with very interesting and surreal results!

Balance
Balance is very important inside a frame. Let’s try to define that. As we discussed, when a form has greater contrast it attracts our eyes faster. We define the weight of an object to be proportional to its volume and contrast. So the bigger the object with higher contrast, the heavier. Imagine now that your frame is a traditional set of scales. The axis is the vertical line passing through the centre. A photograph is then called balanced when each side carries the same total weight. See the image below for further clarification.

Subject separation
Important subjects in your composition must have enough space to breathe. That means you have to properly decide where each of your main subjects lives. As a subject, we count a complete form, which means that a group of objects or persons if put together, are counted as one subject. Each of them must have a clean background around it and have enough space to justify its place in the composition. Avoid placing an important subject where one of its sides touches the sides of the frame or overlaps with another important subject(form). That is only true if most of the subject is included in the frame. If a good portion of it is left outside the frame for a reason, that is a different case. However, even in that case, the parts of this subject that are inside your frame should also have enough breathing space.

Deep composition
There is a set of techniques used to create depth in a frame. Experiment using smaller apertures. This way, most of your image will be in focus, so the viewer will be able to see more of the composition, even subjects that are far away from the lens. To me, large apertures and blurred backgrounds (bokeh) are usually a sign of weak composition. Next, try to incorporate multiple layers in your image. When the viewer can see a foreground, a middle ground, and a background, they can understand depth more easily. Finally, focus on the subject that is further away from you. Novice photographers tend to always focus on the subject that is near them. Try to do the opposite and leave the subject that lies in the foreground to be out-of-focus.

Silhouette
The use of silhouettes is a very classic technique in photography to incorporate a sense of mystery in the frame. To have a subject appear as a silhouette, you need to place it in front of a brighter light and expose for the lighter part of the image. Silhouettes don't have to be completely black, although you can do that too, they can be low-key compared to the rest of the image. Use the other guidelines to compose the frame.

To crop or not to crop
I personally never crop my photographs. There are a few reasons for that. The most important is that by cropping a photograph, you change the perspective of the lens. So every time you have many decisions to make, which ultimately will change the uniformity across your work and make you see the frame differently every time. To that end, I also never change my lens, so I keep a certain way of looking through the camera. I am so familiar with the configuration now that I do not even have to look through the viewfinder to compose my image. I know exactly what to expect when I do. Another important factor is that if you make it common practice to crop your images, it makes you lazy. You think to yourself that you do not need to walk near the subject because you can change that later by cropping (which you can't because, remember you will end up with a different perspective). Sometimes to reach the proper place, you need to get permission and make your life a bit harder. I know. But I think that fact makes you a better photographer because good things never come easy. Cropping also makes you lazy because you spend less time thinking about what to include or exclude in your image. That is the most important decision in photography, so it is never a good idea to try to avoid it. Finally, think about the time when you have a significant body of work that you want to present at an exhibition. I've been to exhibitions where the images were so many different proportions. 3 by 4, 2 by 3, square, 3.5 by 4... You get the idea. That looked totally awkward and very incoherent.

People smiling
“Say cheese!”
People for some reason ask others to smile in front of the camera. That has been a common practice in photography because people connect photographs to having an archive of good memories. And who wouldn't smile during a happy moment, right? Well, since we are discussing photography as art, art is not always connected to good memories but can signify an infinite number of things. So you need to discard this stereotype. I am not saying that having someone smiling is always a bad thing, but it is not necessary. Think of the great works of art, in painting or photography. How many of them have people smiling? Hell, I wouldn't even take a vow about the Mona Lisa! The problem with asking people to smile is that when you do that, they don't smile, only pretend to do so. When we smile, everything on our faces is happy. Not only our mouth but our eyes, our eyebrows, our cheeks. When people pretend, they just shape their lips, so you can always tell when you look at the photograph later. In my photos, I ask the models most of the time not to smile. But when they do, I make sure I catch them in a moment when they smile about something.


See many other great images
Last, but certainly not least. The more great images you see the more you develop an understanding of good framing and composition. I cannot stress enough how important this piece of advice is. You need to see thousands of great images to train your brain to mechanically catch a great photographic moment in front of you and realize that a photograph is hiding in that particular scene. The problem is that today with social media, we see a gargantuan number of images every day, that are unfiltered. By unfiltered, I mean that it has been just the creator's choice to share it with the world. The result is that you are bombarded with this vast number of aesthetic garbage and to the novice eye, it is very difficult to separate the wheat from the chaff. For this reason, you need to see images from sources that carefully curate the images they present. You can check out Magnum Photos for starters, as well as other agencies, also media such as the New York Times, and similar sources. I think the best source however is the photographic books, mainly the ones that are not self-published. That is because a book hides a great deal of work behind it to be produced. The photographer himself gave it a great deal of thought and it then has been filtered and curated by the publisher. You also get to see printed images that are rather uncommon these days.
You can check out a list of books I suggest, here.


Get your copy of the book by George Tatakis, “Throw away your camera & become a photographer” on Amazon
⭐⭐⭐⭐⭐ 5-star review from Readers' Favorite


Comments